
Setup Android 12 Build Environment
This is the first article in the Android series, introducing the process of setting up and debugging the Android development environment. The following demonstrates the process of setting up the environment on Ubuntu 20.04.
Installing Android 12 Environment Dependencies
Reference documentation for environment dependencies: Setting Up the Build Environment
sudo apt-get install git-core gnupg flex bison build-essential zip curl zlib1g-dev gcc-multilib g++-multilib libc6-dev-i386 libncurses5 lib32ncurses5-dev x11proto-core-dev libx11-dev lib32z1-dev libgl1-mesa-dev libxml2-utils xsltproc unzip fontconfigDownloading Android 12 Source Code
Downloading the Repo Tool
Downloading the Repo Tool
AOSP code is managed via git, and multiple git repositories are managed using the repo tool. Before downloading the code, you need to download the repo tool. For Ubuntu, the repo tool is available in the Ubuntu software source and can be installed directly via apt:
# Debian/Ubuntu.
$ sudo apt-get install repo
Alternatively, you can install it by executing the following script:
$ mkdir -p ~/.bin
$ PATH="${HOME}/.bin:${PATH}"
$ curl https://storage.googleapis.com/git-repo-downloads/repo > ~/.bin/repo
$ chmod a+rx ~/.bin/repo
Modifying the Repo Tool for Domestic Use
Since AOSP code cannot be downloaded from Google’s servers in China, the repo tool needs to be modified to download from a domestic mirror server. For example, to download from USTC mirrors, use the vim tool to modify the REPO_URL in the repo script to https://gerrit-googlesource.proxy.ustclug.org/git-repo
vim ~/.bin/repoAdd the following on line 143:
 140 # repo default configuration
 141 #
 142 REPO_URL = os.environ.get('REPO_URL', None)
 143 REPO_URL = 'https://gerrit-googlesource.proxy.ustclug.org/git-repo'
 144 if not REPO_URL:
 145   REPO_URL = 'https://gerrit.googlesource.com/git-repo'
 146 REPO_REV = os.environ.get('REPO_REV')
 147 if not REPO_REV:
 148   REPO_REV = 'stable'
For repo command reference, see repo.
Downloading the Code
Since direct access is not available in China, use Tsinghua or USTC mirrors for AOSP sources.
The following explains how to download the Android 12 r3 code:
-
Create and enter the android12_12.1.0.r3 directory.
-
Initialize the code repository:
repo init -u git://mirrors.ustc.edu.cn/aosp/platform/manifest -b android-12.1.0_r3To download code from other branches, modify the -b parameter. For branch information, see Android Branch Description.
-
Sync the Code
The Android codebase is large, and syncing the code will take some time. It is recommended to have at least 200G of available space on your PC. The following command syncs the code using 8 threads:repo sync -c -j8
Reference documentation for downloading the code: Downloading the Source.
Compiling the Code
Compilation involves three steps: initializing the build environment, selecting the product, and compiling:
-
Initialize the Build Environment
source build/envsetup.shThe build/envsetup.sh is a shell script that defines very useful commands for Android compilation, code search, file search, directory navigation, etc. Due to the large amount of Android code and deep directories, these commands greatly improve efficiency. For detailed instructions, see this file or enter the hmm command for help.
-
Select the Product
Use lunch to select the product to compile. This document uses the x86_x64 emulator image as an example.
(1). Modify AndroidProduct.mk to support x86_x64 image compilation
Since the default lunch option in Android 12 does not include the emulator image, the mk file needs to be modified first.
Modify build/make/target/product/AndroidProducts.mk to add sdk_phone_x86_64-eng support:
diff --git a/target/product/AndroidProducts.mk b/target/product/AndroidProducts.mk
index 7d9d90e92a..419cccb80a 100644
--- a/target/product/AndroidProducts.mk
+++ b/target/product/AndroidProducts.mk
@@ -84,3 +84,4 @@ COMMON_LUNCH_CHOICES := \
     aosp_arm-eng \
     aosp_x86_64-eng \
     aosp_x86-eng \
+    sdk_phone_x86_64-eng \
Reference Modification.
(2). Execute the lunch command to select the product:
lunch sdk_phone_x86_64-eng- Start Compilation
Enter the m command to start compilation directly, or you can manually specify the number of threads for compilation.~/code/android12_12.1.0.r3$ m build/make/core/soong_config.mk:195: warning: BOARD_PLAT_PUBLIC_SEPOLICY_DIR has been deprecated. Use SYSTEM_EXT_PUBLIC_SEPOLICY_DIRS instead. build/make/core/soong_config.mk:196: warning: BOARD_PLAT_PRIVATE_SEPOLICY_DIR has been deprecated. Use SYSTEM_EXT_PRIVATE_SEPOLICY_DIRS instead.After compilation is complete, the output is as follows:
......
#### build completed successfully (29:45 (mm:ss)) ####
The generated image can be found in the out/target/product/emulator_x86_64 directory, with the following files:
out/target/product/emulator_x86_64$ ls -ah *.img
cache.img          product.img        ramdisk.img               super_empty.img  system_ext-qemu.img  userdata.img       vendor_boot-debug.img         vendor.img
dtb.img            product-qemu.img   ramdisk-qemu.img          super.img        system.img           userdata-qemu.img  vendor_boot.img               vendor-qemu.img
encryptionkey.img  ramdisk-debug.img  ramdisk-test-harness.img  system_ext.img   system-qemu.img      vbmeta.img
Running the Emulator
After successful compilation, enter the emulator command in the compilation window to start the Android emulator, which will use the image just compiled.
/code/android12_12.1.0.r3/out/target/product/emulator_x86_64$ emulator
emulator: Android emulator version 30.9.0.0 (build_id 7651928) (CL:N/A)
2022-04-21 15:06:36.680 bluetooth - /buildbot/src/android/emu-master-dev/system/bt/vendor_libs/test_vendor_lib/model/setup/device_boutique.cc:33 - Register: Registering beacon_swarm
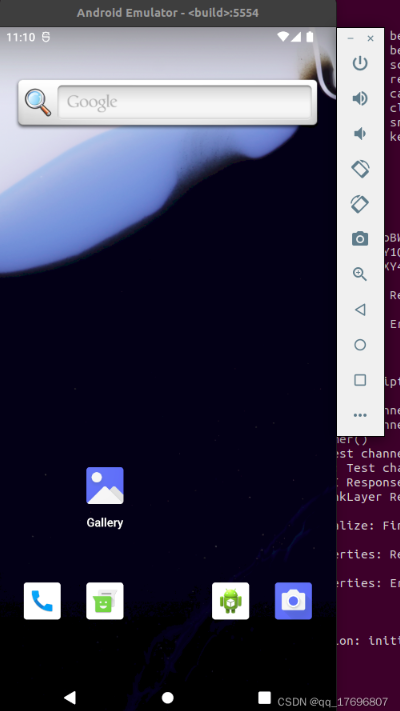
2022-04-21 15:06:36.680 bluetooth - /buildbot/src/android/emu-master-dev/system/bt/vendor_libs/test_vendor_lib/model/setup/device_boutique.cc:33 - Register: Registering beaconThe execution results are as follows:
Note:
- The emulator command here is set by source build/envsetup.sh and lunch during code compilation. The actual location of the emulator is under prebuilts/android-emulator in the Android source code:
~/code/android12_12.1.0.r3/out/target/product/emulator_x86_64$ which emulator /home/zdm/code/android12_12.1.0.r3/prebuilts/android-emulator/linux-x86_64/emulator - If the following error occurs when running the emulator:
mulator: ERROR: Running multiple emulators with the same AVD is an experimental feature.
Please use -read-only flag to enable this feature.
It indicates that an emulator is already running, or it exited abnormally. Delete the following two lock files to run normally:
$ croot
$ cd out/target/product/emulator_x86_64
$ ls *.lock
hardware-qemu.ini.lock  multiinstance.lock
For emulator command reference, see manual.
Compiling Related to Emulator Kernel
https://gabrio-tognozzi.medium.com/run-android-emulator-with-a-custom-kernel-547287ef708c
https://blog.csdn.net/ldswfun/article/details/119786846
https://download.csdn.net/learn/35479/529617?spm=1002.2001.3001.4157


You May Also Like
